First things first… “what is hoop wax and why would I want it?”
Hoop wax is rubbed onto the inner side of your hoop (where your hoop touches your body). If you don’t want to commit to having the inside of your hoop sanded, then hoop wax is a great alternative! Hoop wax makes your hoop grippy. Are you hooping in jeans and find your hoop just keeps sliding down? Hoop wax will fix this! It basically makes hooping in lots of clothes during those cool Autumn evenings more like hooping with bare skin in the summer time. It just sticks better!!
Now lets get down to it. How do you make your own hoop wax??
Ingredients and supplies:
- Beeswax
- Coconut Oil
Yup! That’s it!!
We used 8 parts beeswax and 1 part coconut oil for our hoop wax.
It really is mostly beeswax!! I have heard that you can substitute soy wax, but I haven’t personally tried.
Optional:
You can add glitter and essential oils to your hoop wax. This isn’t practical, it’s just fun! Word of caution, I wouldn’t add any citrus essential oils to your hoop wax. Citrus oils can damage/melt plastics.

You will also want:
- Double boiler (you can make a makeshift one out of two pots that are different sizes)
- Measuring cup
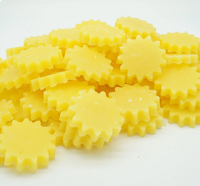
- Mold with shape of your choice (we used hearts!)
- Spoon or small ladle for putting melted wax/coconut mixture into the mold
- Plate
Overview:
You can get white or yellow beeswax. It is easiest to buy it in pellet form so you can measure easily! I personally made a big batch because we actually sell quite a few through the site. I used 8 cups beeswax for 1 cup coconut oil, and it made 150 ten to eleven gram hoop waxes! You could use 4 cups beeswax for 1/2 cup coconut oil, or less. The coconut oil doesn’t have to be a fancy organic brand, it’s just going to end up on your hoop!
The double boiler is so that you can dissipate the heat of your stove more evenly and not burn your wax/oil blend! You will want to put enough water in the bigger bottom pot so that it almost touches the top pot. KEEP AN EYE on your water level! As you heat your wax the water will be evaporating. You might need to add more water!
Your mold should be a ‘compact’ size shape. Something that won’t come out too thin. Because you are rubbing the hoop wax on your hoop you wouldn’t want a shape like a ‘star’ because the edges will break off more easily. It would be ideal if the shapes in your mold were at least 1″ tall and 1″ wide
For the spoon I found it easiest to use a thick plastic measuring spoon. The wax hardens FAST and it was so much easier breaking off the wax bits from a somewhat flexible spoon rather than the typical metal spoon that I started with.

Let’s make hoop wax!
Get your measured ingredients in your double boiler. I recommend melting the coconut oil first, then adding your beeswax. It can take quite a while for the beeswax to melt, and not very long for it to harden! Again, keep an eye on the water level in your pot.
As the wax/oil melts you can mix it. Mix it thoroughly once it is all liquid! You can put your mold on top of a plate or cookie sheet to capture any drips. I guarantee you there will be drips! When filling your mold it may be best to fill it all the way up to the top so that the edges of your shape come out clean. If some of the wax spills over the edge you can fix this by taking the fully cooled hoop wax and pressing any frayed bits against the inside of the original melting pan while it is hot. This will ‘shape’ your wax.
Let your hoop wax cool completely. You can stick it in the fridge (after the top has hardened) to speed up this process.
Pop your perfect lil’ hoop waxes out of your mold, and voila! Lots of hoop wax. Depending on the size of you hoop wax, and how often you use it, a single hoop wax can last for months!


Clean up
I would say that this is the least exciting part of this whole process. It was even more challenging then finding the right size molds!! As you might notice during this process the wax hardens quickly. This is not wax you want in your sink. It will clog your drain 100,000,000x faster than coconut oil!! First scrape out any chunks or pieces of left over wax. Afterwards lightly warm the pan just enough to melt any leftover wax. Very carefully wipe the melted off the pot/spoons/plates with paper towels. User discretion: other items like a ceramic plate can be put in the microwave for one minute to melt the wax to get wiped off.
You might have to do this process several times. FORGET trying to wash the wax off with hot water and soap in the sink. It honestly doesn’t work that well, and you really don’t want that wax in your drains!!

Happy Hoop Wax making, we hope you have a fun time!!!
Did you read this and think “making hoop wax is not for me”? No problem, we just crafted up a huge batch of hoop wax!


















1 comment
Thank you so much for sharing this, I am going to try to make some. You guys are so nice!